
Fighting Game Hardware Hour – Part I
A beginner's guide to building fightsticks
By Robert Smith • June 10, 2020

 Arcade stick controllers (or “fightsticks”) have been a staple of the fighting game genre since players first squared off in dusty arcade halls some three decades ago. They’re accessible and durable, it’s easy to see why fighters migrating to home consoles brought the fightstick along for the trip.
Pre-built fightsticks are widely available in every style and at nearly every price point you can imagine. Quality and functionality varies, but most fightstick components like levers and buttons stick to a standard size and function. This presents an opportunity not only to improve the quality of cheaper sticks, but to customize controllers to individual tastes and needs.
This series breaks down modifying fight sticks: from basic maintenance to simple upgrades and complex tricks and additions. In this first entry, we’ll go over what a stick is made of, and the tools you should have handy before we discuss mods and repairs later in the series.
The teardown
Before starting any project it pays to know the components you’re working with. Arcade controls are designed for easy repair, and that accessibility makes fightsticks incredibly flexible and long-lived.
While some sticks may have different components based on console compatibility or style, the parts below can be found in pretty much every arcade controller. This guide will break each part down later; for now we’ll focus on the basics.
Control Boards
The heart of any fightstick is the primary control board, often called a PCB (careful as this also stands for “printed circuit board”, which is…well, any circuit board). It translates inputs from buttons, joysticks, etc. and sends them to the game console.
A stick’s PCB determines what console(s) are compatible with the stick, but also determines factors like input lag and whether some input combinations are allowed. We’ll go into detail on this later, but keep in mind that your PCB could disqualify your stick from some tournaments, depending on what features it offers (or doesn’t).
The good news is, most commercial fightstick control boards are tournament-legal. There are also after-market PCBs that can control more than one console, and are accepted at most major tournaments. If you’re patient, you can even convert a standard gamepad PCB into a fightstick control board (a “padhack”) to save some cash on buying a PCB for a new build.
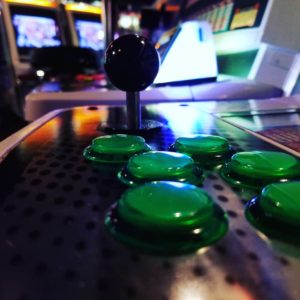
Buttons
 Fun to mash, less fun to get out of a case, and a staple of fightsticks everywhere. Arcade stick pushbuttons feature a simple switch and “plunger” inside a cylinder that attaches to the stick case. Buttons connect to the PCB from two terminals (positive and negative, or “ground”.)
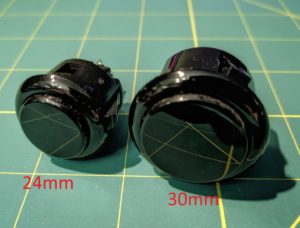
Buttons typically come in 30mm and 24mm diameters. 30mm buttons usually make up the 6-8 button group on top of the stick, while 24mm buttons are most often used for secondary actions like “select” and “start.” The exception here is the hitbox, an all-button fightstick that often uses 24mm buttons for main actions and directions. We’ll talk more about hitboxes later in this series.
Buttons typically mount to a stick with tabs that clip onto the case, but “screw-in” options exist that use a plastic nut. There are benefits to each mounting type that we’ll discuss later, as well as the different types of switch available for pushbuttons.
Joystick

Joysticks are slightly more complex than buttons, and come in more varieties. The type of joystick you prefer can depend heavily on the types of fighting games you play, the size of your hands, and more. There are several types of lever out there, but we’ll focus on two of the most popular: Japanese- and Korean-style levers.
The most important thing that sets these two apart is that Japanese levers use a spring for tension, which Korean levers replace with a rubber grommet. In both cases, a “gate” sits at the bottom of the stick to limit how far it moves to one side. Also, Japanese levers usually include a “balltop” handle for grip, while Korean levers traditionally feature a “battop” handle.
Many players prefer Japanese levers because they’re cheaper, more common in arcades, and feel better for inputs usually found in 2D games like Street Fighter. Korean levers tend to feel “snappier” when returning to a neutral position, and are often favored by fans of 3D fighters like Tekken.
There are a lot of ways to customize joysticks, which we’ll cover later on in this series.
…and the rest
Aside from the components mentioned above, most fightsticks include wires to connect everything together, an output cable (typically USB), and any other extra inputs that a certain console might require like a PS4 touchpad. Some fightsticks also feature audio outputs and even bluetooth transmitters for wireless communication.
Some of these extra features are optional–except, y’know, wires–and won’t affect the function of the stick in most cases. Later in this series we’ll break down “reading” the PCB and where to go from there, which can be important when building from scratch or migrating a PCB from another stick.
Plan it out
Knowing your way around the inside of your fightstick can pay off even if you never intend to make changes, but we’re here to get our hands dirty. It can take time for beginners to get comfortable even using a fightstick, so understanding how to customize it means observing how you play and what you can improve with different hardware.
For example, it’s worth keeping in mind the “standard” for arcade controls when you make changes. You may not always get to use your own stick, for instance when a tournament features full arcade cabinets. There are mods and accessories that make your stick more comfortable or your inputs more efficient, but they can change how you play in subtle ways.
 While this doesn’t mean you shouldn’t change certain parts, it’s worth asking yourself if you’re making a change to cover up a bad habit or to genuinely improve and reinforce your play. Joystick gates are a great example, because you can replace the standard square gate on most levers with an octagonal one, making diagonal directions easier. This can make for more confident movement in 3D games like Soul Calibur, and can make some 2D inputs feel more precise…but an octagonal gate won’t fix an inconsistent “shoryuken” input.
Modifications can also breathe new life into old or “cheap” controllers. Many budget fightsticks come with low-quality buttons, and replacing these can add a lot of quality without the price tag of a brand new stick. You can often update fightsticks built for older consoles by adding an aftermarket PCB. Plus, these sticks are often available cheap on sites like eBay, or even in local game stores.
The mods you choose also depend heavily on your budget, as well as level of experience. If you’re just starting out, taking on a full build may not be the best course, even with this guide to help. Buying cheap and building out can teach you a lot, but you may also find you waste a bit of money on components you end up buying again.
Take time to think about what you really want from your stick, what you’re comfortable taking on, and how much you want to invest before you jump in. Building a quality stick from scratch is not always cheaper than buying a stick off the shelf, and sometimes a pre-built stick can be a gateway to something really unique.
Coming up next
 Part one of this guide covered the basic anatomy of a fightstick as well as what to think about when starting your first project. There’s a good deal more to each of the concepts covered here, and later entries in this series aim to dive deeper into each of them.
Part two will take a closer look at some of the basic (and most cost-effective) repairs and upgrades that can turn a busted or budget stick into a quality fighting machine. This includes what tools to keep handy for any project, what buttons to choose and how to install them, and much ado about joysticks.